
Do you run a company which sells service, hospitality or travel-based products and sigh with jealousy at the extra love that Google shows to e-commerce retailers? Shopping ad formats, dynamic remarketing ad creation etc, why should e-commerce guys have all the fun, while great companies who don’t happen to sell physical products online get neglected?
Well, the good news that you might not be aware of, is that Google rolled out dynamic remarketing to virtually all business types towards the end of last year, so companies offering products not suitable for inclusion in a merchant centre (basically anything you can’t physically hold in your hands) can now serve dynamic remarketing ads. As well as serving more relevant ads to previous visitors to your website, another great benefit of dynamic remarketing is that it cuts down on the resources required to set up lots of different image ads, which was previously required to show highly-customised ads to users based on their previous browsing history. Dynamic remarketing saves time by specifying an image to be used with the ad, which is then overlaid with information like price and call to action buttons.
Sounds awesome right? So if you are a business or advertiser selling non-physical goods and you want to get in on this, what should you do?
Well, firstly, in-case I’ve lost you at the back already, a quick definition of dynamic remarketing is as follows:
Dynamic remarketing delivers relevant display ads based on products or services users have viewed on your website. The products or services displayed in the ad are dynamically selected from a data feed. A product data feed is like a database filled with information about your product or service. Each category of information is called an attribute, examples of common attributes in a data feed are “Item category”, “Item title”, “Image url” and “Destination url”. Different products will display different values for each attribute.
Broadly speaking, there are 4 steps involved to setting up dynamic remarketing in your AdWords account:
- Create dynamic remarketing campaign
The first time you set up a dynamic remarketing campaign, you’ll also need to create your remarketing tag, audience lists, and feed. - Creating product or service feed
Create a feed that includes all of your products or services, along with details about each item (unique ID, price, image and more). These details are then pulled from your feed into your dynamic ads. You’ll upload your feed to the Business data section of your Shared library. IMPORTANT: The type of data you supply to the feed will change depending on which industry you are in, so take care to choose the most appropriate option for your company when you set-up your dynamic remarketing campaign.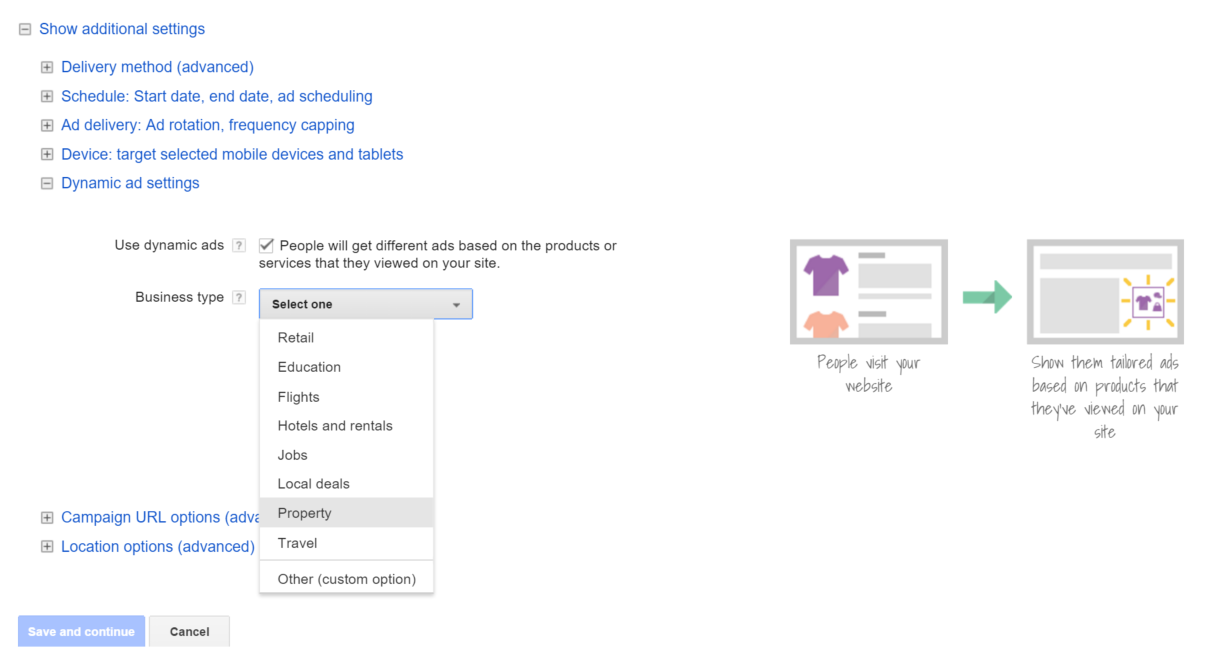
- Tag your site with custom parameters
Add the dynamic remarketing tag with custom parameters to all pages of your website. The tag adds your website visitors to remarketing lists and associates them with the unique IDs of the feed items that they viewed. You’ll find your tag in the Audiences section of your Shared library after you have created your dynamic remarketing campaign. Like the product feed, the custom parameters required to be added to the remarketing tag change depending on which industry your company falls into. It is possible to update the Google Analytics code to include custom parameters for dynamic remarketing, but this process is more complicated than working with the AdWords remarketing tag, as it involves setting up dynamic attributes and custom dimensions to transport the necessary data from GA to AdWords. For this article, we will focus on setting up the necessary steps using the AdWords remarketing tag. - Creating the dynamic ads themselves
Dynamic ads use layouts in numerous sizes and formats for modern platforms, including HTML5 for mobile devices. You’ll create the dynamic ads in the Ad gallery. Dynamic remarketing ads allow advertisers the option os using AdWords’ algorithm select the best ad format to display product data in each auction and ad inventory slot the advertiser is active in, or to test different formats and layouts like more traditional display ad campaigns.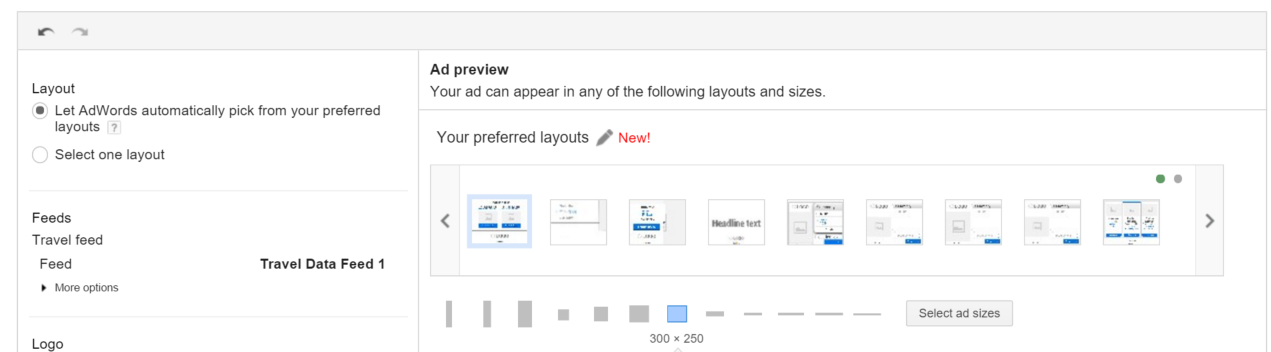

Creating the dynamic remarketing campaign
- Create a new “Display Netrowk Only” campaign in your AdWords account, either Leave the “Marketing objectives” option selected and check “Buy on your website.” or select “no marketing objective” and make sure the “all features” option is selected.
- Choose a campaign name, bid strategy, and budget as you would with any new campaign.
- Expand “Show additional settings”. Expand “Dynamic ad settings” and check “Use dynamic ads.”
- Click “Business type” and choose the business type that represents your products or services. If your business type isn’t listed, select “Other – custom option”.
From here, click “Set up remarketing” to begin the process of creating your remarketing tag, lists, and feed:
- Step 1: AdWords will create an empty feed. You’ll be able to email the link to your feed to yourself or your feed specialist, along with instructions on how to complete and upload your feed.
- Step 2: AdWords will create the remarketing tag for you. You’ll be able to email the tag to yourself or your webmaster, along with instructions on how to add it to your website.
- Step 3: AdWords will automatically create 4 or 5 default lists to get you started, so you don’t need to create these lists yourself. Default lists include visitors who came to your website but didn’t view specific products or services, visitors who viewed search results, visitors who viewed a specific product or service page, visitors who started but didn’t complete a conversion, and visitors who converted. You can later create new lists for your different groups of website visitors.
- Click Return to campaign. Click “Feed” and select your new feed. Click Save and continue then enter an ad group name and bid.
- On the Remarketing lists tab, you’ll find your default remarketing lists added to your ad group. Click “Save and continue” if you want to create your dynamic display ads, or “Skip ad creation” if you want to do this later.
Creating product or service feed
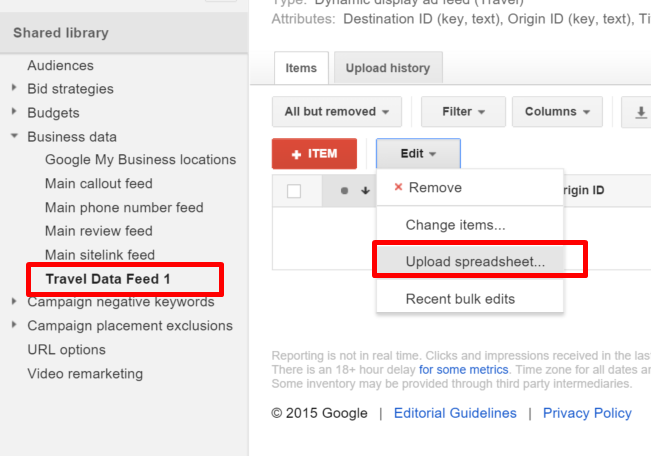
After the initial feed has been created, you will need to create a spreadsheet of product data and upload it to the feed to populate it with your product data. This can be done by visiting the business data section of AdWords, selecting the correct feed and uploading the completed feed file. The feed can also be updated to include changes to product prices, image urls etc via the same method, just upload the new sheet with updated details to the same feed.
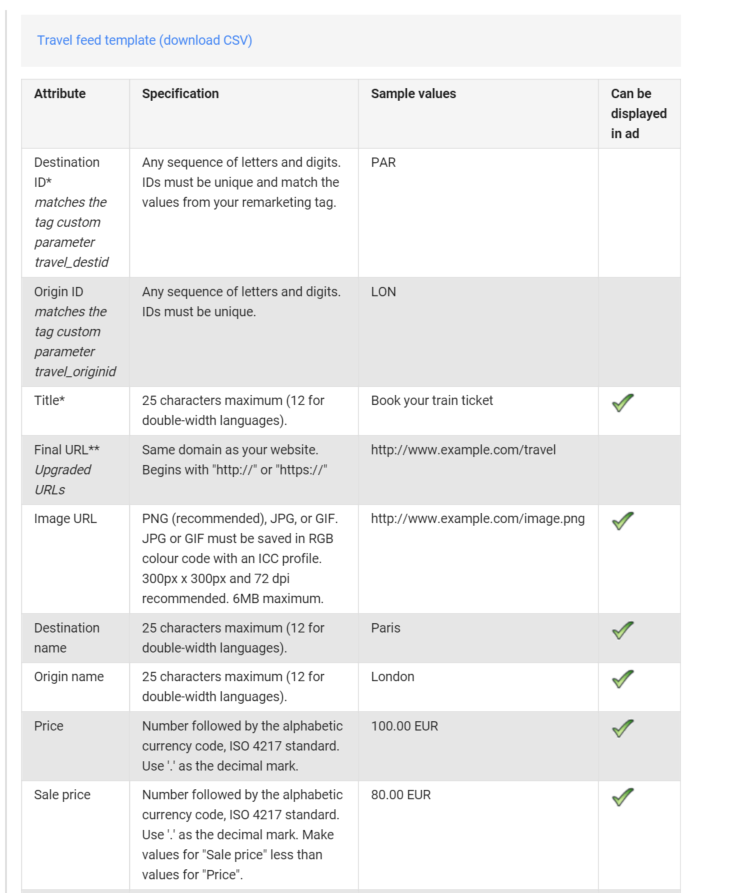
As mentioned above, the attributes you will include in your product feed spreadsheet depend on the type of industry your company falls into. Feed templates for all industries are available from this page on the Google help centre. Our example uses a feed for the travel industry, some of the attributes of which can be seen in the screenshot below:
NOTE: Some attributes are strictly required to make a feed work correctly, the others are optional and can be included or not, depending on how much data you plan to use in your ads. It’s best to fill out all fields in the sheet if possible so you have the option of using the data in the ad later if you need to.
Tag your site with custom parameters
To use dynamic remarketing, you’ll need to add the dynamic remarketing tag with custom parameters to your website so that your lists can start working. When adding the tag and customising it with custom parameters that suit your business, it helps to work with a technical member of your team like a web developer.
The dynamic remarketing tag collects data, such as the IDs of the products or services that people viewed on your website, the types of pages viewed (such as shopping cart pages) and the total value of items.
Continuing with our example from the travel industry feed type, here’s how the code to place would look before the values are entered for each product:
IMPORTANT: The travel_destid attribute must match exactly the corresponding attribute used for the product in the data feed
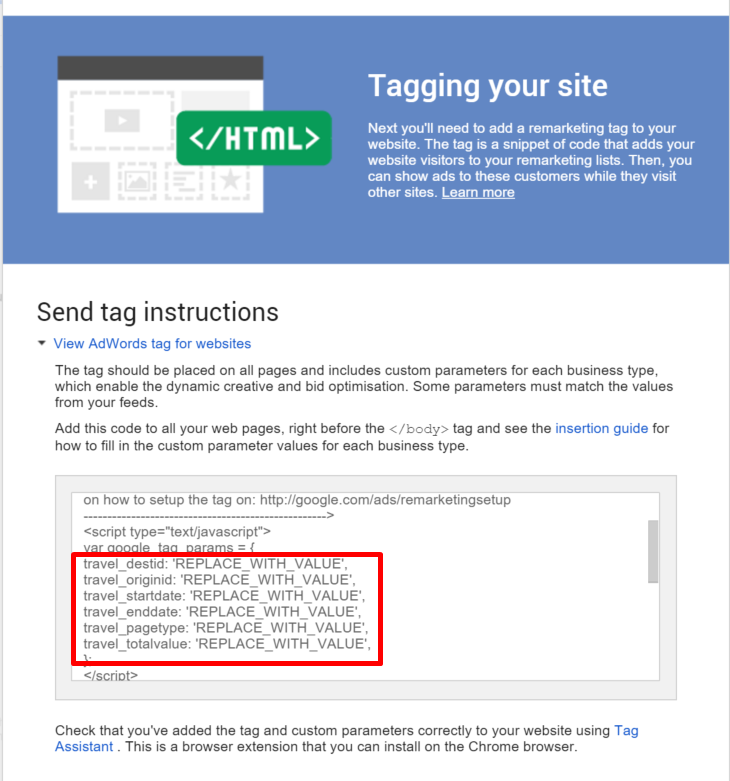
You can get your tag when you set up your dynamic remarketing campaign, of later on from your AdWords account by going to the “Audiences” section of your Shared library. You’ll want to have the entire code snippet on each page of your site, just before the </body> tag. The code should use JavaScript Literal Object Notation, a format for transmitting structured data over a network connection. If you already have a standard remarketing tag and want to start using dynamic remarketing, you can make a few changes to your existing tag. These changes will let you send additional information to AdWords through your tag.
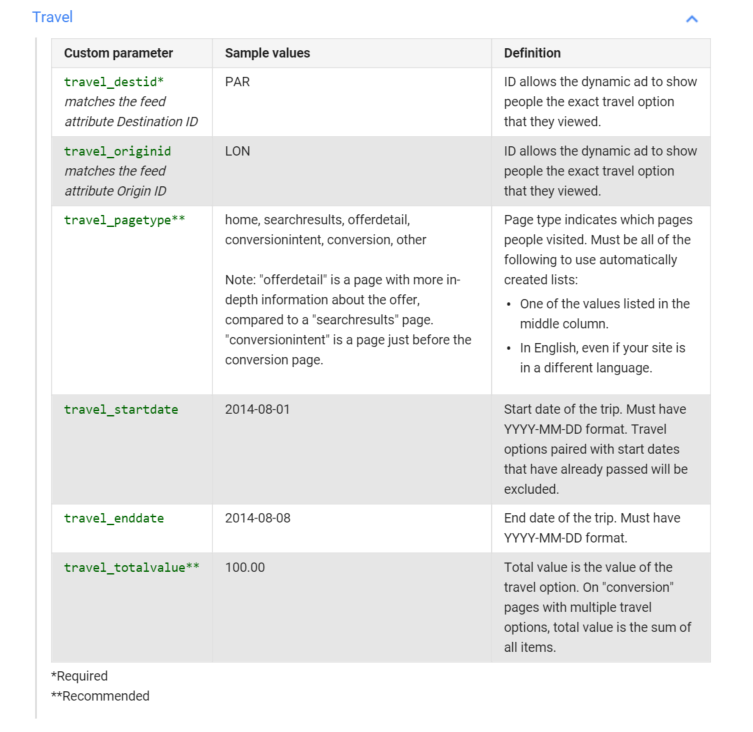
More guidance about the values to enter for each attribute in the code is available from this page. The screenshot below displays the definitions for each attribute (required and optional) applicable to the travel remarketing tag.
Creating the dynamic ads themselves
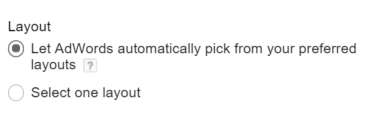
You’ll have the opportunity to create these ads when you’re setting up your dynamic remarketing campaign, in your account’s Ad gallery. When you create dynamic ads, you’ll specify whether they should use a particular ad layout or your preferred layouts. With preferred layouts, you’ll choose the layouts and features that you want. Features of layouts include multiple product carousels, cropping your images to fit the ads, star ratings and more. As mentioned above AdWords can predict the layouts that are likely to perform best for the people, placements and platforms where they’ll show, making your dynamic ads even more effective. To use this feature make sure the “Let AdWords automatically pick from your preferred layouts” option is checked in the top corner of the Ad Gallery.
To use the Ad Gallery to create the dynamic ads:
- Click on the Ads tab.
- Click the + Ad drop-down menu and select “Ad gallery”. Choose “Dynamic ads”, then click Create.
- Choose either text or image ads and click Create. Depending on the template you select, you may be required to provide a layout, logo, headline, Display URL, Final URL, ad name or button.
- If you chose image ads, go to “Layouts” and choose “Let AdWords automatically pick from your preferred layouts” or “Select one AdWords layout”.
- Let AdWords automatically pick from your preferred layouts:
- All dynamic ad layouts and features are turned on by default, but you can exclude specific layouts and turn off features that you don’t want. As more ad layouts with the features that you’ve turned on become available, AdWords will automatically add them to your preferred layouts.
- Next to “Your preferred layouts”, click the pencil icon. You’ll be taken to the “Choose your preferred layouts” screen. To exclude specific layouts, place your cursor over the layout and click the “x” that appears. To turn off layout features, click the “On / Off” switch
- Click Apply when you’ve finished.
- Select one AdWords layout. Click the drop-down menu below and choose an AdWords layout.
- Let AdWords automatically pick from your preferred layouts:
- Click Save and preview.
Customise the text in your dynamic ads
While there are numerous ad layouts available, you may want to customise your dynamic ads further. If you’re using an education, flights, travel or custom product data feed, you can customise how the attributes from your feed are arranged in your dynamic ads text, using attributes from the feed you uploaded earlier. This is where it pays to have more information in the feed so you can decide what to include in the ads.
Here’s how you customise your dynamic ads:
Under “Feeds,” click “More options”.
Click in the field next to the ad element you want to customise, such as “Headline”.
In the drop-down menu that appears select a feed attribute. For example, “{Destination ID}”. You can also include these attributes in static text. For example, you could write a salesy headline which focused on the price of the product by using the syntax “Product X available from only {Price}”
Phew! We got there in the end. There was a lot of information in this post, so to recap, the most important things to remember when creating dynamic remarketing campaigns are:
- Choose the right industry type for your product feed and remarketing code
- Make sure the remarketing code is on every page of your site, and the attributes match up to the relevant attributes in the product feed
- Include as much of the optional information in your feed as possible so you can use it in your ad later if you want to experiment with showing different call to actions or selling points to users
Do you have any questions about using dynamic remarketing ads? Feel free to let me know in the comments section or give the Reef AdWords team a shout via our website.